Showing posts with label butter. Show all posts

Monday, December 23, 2013

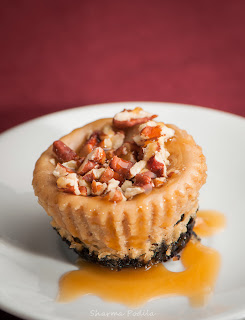
Pecan Caramel Espresso Cheesecake Bites

Made this for a party and everyone loved it.  :)  You definitely need to like coffee as the fresh Espresso has wonderful kick to it.  It's definitely a blend of 2 passions from my house... For those who don't know, my hubby loves coffee.. more like LOVES Coffee. I came across a recipe and then he came to mind.  The original recipe called for "Instant Coffee" and at that "instant' I thought, I could have the coffee instantly made for me instead. And of course, the fact that no Instant Coffee can be found at my house helps. ;) So, I chose a time that was good for both of us to make my Pecan Caramel Espresso Cheesecake Bites. 
 
Realized later that I forgot to mention to my guests that I made it with Low Fat Cream Cheese... apparently that made no difference at all.  ;-)
 
Here's my version of the recipe... I tweaked it to our liking and believe the use of fresh Espresso made a huge difference!  It should be used within minutes of making else will bring on a bitter taste to your dessert. Making my own crust with freshly ground Oreos added to the taste as well.  :)  I made 24 Mini Cheesecake bites using a mini-muffin pan lined with paper liners (very important).

For Cheesecake
2 pkg.  (8 oz. each) Trader Joes Low Fat Cream Cheese, softened
1/2 cup  sugar
2 tsp.  vanilla
 eggs
Tbsp.  milk
1 Double Shot of Espresso - freshly made (use within minutes)

For Crust
Mini-cupcake pan with liners
OREO Cookies - crushed into a fine powder (I used my Magic Bullet)
1-2 Tbsp. melted butter - to hold the Oreo mixture together

Topping
1/2 cup Toasted Pecans - roughly chopped
Smucker's Caramel Sundae Topping


PREHEAT oven to 350°F. 

Make Crust: grind up Oreos into fine powder.  Mix in butter as needed just enough to hold the powder together. Put a teaspoon (or so) into each of the cupcake liners in the pan and press down with the end of a spoon so it's flat.

Beat cream cheese, sugar and vanilla with electric mixer on medium speed until well blended. Add eggs; mix just until blended.
MICROWAVE milk in small microwaveable bowl 15 seconds. Add Espresso shot to milk. Then add that mixture to the batter; mix well. Pour into individual crusts.
BAKE 20 minutes or until center is almost set. Cool. Refrigerate several hours or overnight. 
While oven is still hot put pecans in and toast for 5-8 minutes. Keep an eye on them as they burn easily. Once cooled, roughly chop.

Few minutes before serving take the mini-cheesecakes out of the fridge. Remove liners from each and set out on a platter to serve.  Top each piece with the crushed pecans and top with a little bit of the caramel syrup.  Serve and Enjoy!! 

Store any leftover cheesecake in refrigerator.


Wednesday, December 11, 2013

Garlic Mozzarella Pinwheels....

Here's a simple appetizer recipe to keep handy for those days when you need something quick.  I tried these out recently to take to my Book Club's Holiday Party.  My tasters/testers at home, oops I mean, my family :) liked them and my friends enjoyed them at the party.  Here's what I did with a few ingredients I had on hand. I'm sure that once you stop to think about it you will be able to think up combinations to make your own sweet or savory Pinwheels.  Enjoy and Happy Cr-eating!


I used:
1 sheet of Puff Pastry (make sure it's cold but, you're able to unroll it)
Pre-made Garlic Butter Spread (If you don't have this, make a spread of your own... try Butter with Garlic Powder or a bit of minced garlic.  Add a spoon of Oregano or Italian Seasoning and a pinch of salt.)
3 TBSP Mozzarella cheese
1/2 TBSP Dried Basil (crushed)

I laid the puff pastry flat and brushed on a thin layer of the Garlic Butter Spread. On the end from which I was going to start rolling,  I spread the Mozzarella cheese from end to end - preferably the short side.  I left a little bit of an edge that would help me get the rolling started easier. I gently lifted the puff pastry and started rolling to the other end.  Once I had a tight rolled log, I put it in the freezer for about 10 minutes so that it would all set together, making it easier to cut.

I cut the log into slices and laid them on a baking sheet. I baked them for about 12 minutes.  Since all oven cooking times vary and the thickness of your slices will also have an effect on how much time they need to cook.  Just keep an eye on them the first time.

Take them out when they are a bubbly golden brown.  Sprinkle the Dried Basil over each one while they are still hot.  Enjoy!

The possibilities are endless.  :)  Here are just a few other options to fill your Pinwheels with:

Nutella
Sugar (makes the well known treat, Palmier)
Mexican Cheese and Jalapenos
Indian Curry Filling (Mashed Potato & Veggies)


Tuesday, May 10, 2011

Time flies when you're having fun!

So, April went by in a flash. Time was spent with family and friends and of course the much awaited arrival of Spring Break!!  I did a little baking (Gram's Best Brown Sugar Cake, Zucchini Bread & Biscottis) during my cousins visit and was happy to have company in the kitchen. :)  Here are a few recipes to share from then...

Here's the Zucchini Bread recipe (thanks to Jen K. for it!).  If you're thinking my kid would never go for zucchini in bread, lest you be assured that you can't really "see" the zucchini in it. And if you choose to use the chocolate chips, well then.... the little specks of green magically disappear! :o) 

3 Eggs, beaten
1 cup Oil
2 cup Sugar
2 tsp Vanilla
2 cups Grated Zucchini
(if you're short on zucchini add grated carrot works just the same)
3 cups Flour
1 tsp Baking Soda
1 tsp Baking Powder
1 tsp Salt
2 tsp Cinnamon
2 cups chocolate chips or nuts, or combination of the two
(after making it a few times, I've come to where I seperate the batter into different batches at this point - a handful or two of chocolate chips in one for the kid and just nuts in the other for us, once you make it you'll get an idea for what your family cares for)

Preheat oven to 350 degrees.
Beat eggs. Add oil, sugar, vanilla, and zucchini. Beat with an electric mixer.
Mix flour, soda, baking powder, salt and cinnamon. Add to egg mixture. Beat well and add nuts/chocolate chips.

Bake approximately 1 hour in 2 well greased and floured loaf pans.

I've made them in loaf pans, mini loaf pans and as muffins, they taste any either way.  :) 

Zucchini Walnut Bread

Gram's Best Brown Sugar Cake is a recipe I found sometime ago in a Kraft magazine. It's a moist and delicious party cake.  Unfortunately, it hasn't stayed intact long enough for a worthwhile picture (note to self: next time, picture first, serve later) ;)

Here's the recipe in any case because, if you make it, you will like it even without my picture. ;) Enjoy!

Which brings me to last week. It was a busy week at my house (I guess like all our houses these days!) Spanish presentation, Teacher Appreciation Week, Cinco De Mayo, and mundane household to do lists that were growing!

For my daughter's Spanish presentation she and a friend were studying Venezuela.  She asked if there was something she could take to class so that their classmates could sample Venezuelan food too. And I of course being me said, "well, let me see." :)  So, after a little bit of research and an apparent passing comment from her teacher, it was settled.  I was trying my hand at Arepas, Venezuelan Corncakes. :) 

Here's the recipe I used and it turned out well. We all liked it at home and a couple of kids in class told me they liked them too.  The teacher told me they tasted good and my attempt was good.  ;)  Apparently, they also make them stuffed with cheese. I will have to try that sometime.  :)

You have to use a special cornmeal for it, which of course (after much shop-hopping) I found only at my local Wal-Mart. So, if you'd like to try it, buy the Minsa brand, it worked. :)  Serve them hot!


Venezuelan Arepas


In honor of Cinco De Mayo and my intent to make something different for our meal with a treat (how convienient), we ended up with Mexican food; enchiladas, veggie "oven fries", and dessert. I had been wanting to try these little bite sized yummy cookies for a very long time. This was my opportunity.  ;) 

Mexican Wedding Cookies!! They're delightful; I wonder why I'd waited this long to try them. :) I've got a few ideas for variations and look forward to updating with them soon. In the mean time...allow your mouth to water or try making these! :)

Mexican Wedding Cookies

Happy Baking & Creating!!

Tuesday, February 15, 2011

If you like Brownies...

The most Red Heart, Red Flower, Red Everything day of the year has passed yet again.  Hope you enjoyed it with your loved ones. :)


And another fun weekend for my family; filled with reminders from my daughter that we were signed up to take brownies for her class party and a couple of get-togethers with friends and family.

So, with brownies on my mind, I set out to find a new recipe to try.  As I went through several of my cookbooks looking for that something new and interesting to jump out at me, I came across a recipe for an Oatmeal Brownie.  You may be thinking to yourself, who in their right mind puts oats and brownies together?! Um...apparently the folks at Betty Crocker and me! ;)

Since Oatmeal Walnut Raisin cookies and Oatmeal Pecan Chocolate Chip cookies are always a hit, I thought this layered brownie recipe sounded interesting (oatmeal is healthy, right?) and figured this would be easy to do as well.  My helper :) chopped up some pecans so we added them to the reserved portion of the topping as well. Feel free to omit nuts or use a different one, walnuts or hazelnuts would be nice too.

The recipe that follows is my version, simplified and modified from the original.

Here's what they looked like:


Oatmeal Fudge Layered Brownie


For the crust and topping:

2 1/2 cups Quick Cooking or Regular Oats
3/4 cup All-Purpose Flour
3/4 cup Packed Brown Sugar
1/2 teaspoon Baking Soda
3/4 cup Butter, melted
1 cup Pecans, roughly chopped

Heat the oven to 350 degrees. Grease a 13x9x2 baking pan (or line it with aluminum foil for easy clean up). Mix oats, flour, brown sugar, and baking soda; stir in margarine/butter. Keep aside about 3/4 cup of the oat mixture (and if using, add the nuts to this) to use as the topping. Press the remaining oat mixture into the pan. Bake the crust for about 10 minutes and allow it to cool for 5 minutes.

For the Brownie: 
1 box Ghirardelli Fudge Brownie Mix
(follow directions on box)


Here's a tip.  Ghirardelli Fudge Brownie mix is the bomb!   Although I have tried my hand at making brownies from scratch, there is just some thing about this mix that beats all others.  It is very moist and fudge-like and it's hard to match. So, when I'm in a pinch (and even some times when I'm not) I use this mix.  :)

To assemble the Brownies:  After you have made up the brownie mix according to the box, pour the batter over the baked oatmeal crust. Spread it around and make sure it goes over the entire crust. Top the batter with the reserved oatmeal topping mixture, spreading evenly across.  Put it in the preheated oven to bake for approximately 35 minutes. The top should be a golden brown. Remove from oven and let cool. 

Once it's cool, cut into 1 1/2 inch squares.

It makes enough for a crowd and travels well.  Enjoy!