Wednesday, November 16, 2011

Catching Up...

So, Baker Mom went on break for awhile (a long...while it seems) she suddenly realized... she wrote some and never posted and then lost track of time and didn't write...wasn't home...didn't bake... time to get back to it all she thinks. ;-) 

After a hectic summer which included 3 weeks in SoCal (thanks to my daughter) and a quick trip to visit my folks in LA (read: Louisiana heat :)) I'm finding myself needing to play catch up.

So, here goes... you may wonder why my family moved itself to beautiful SoCal for a stint, well... the kiddo applied and got into the summer program through John's Hopkins University, Center for Talented Youth.  She chose to go to a camp called "Be A Scientist." Hence we decided to head out to LA, the closest place offered near home for her age and grade level. Road Trip!!!

Here's some tidbits that I'd written while there...enjoy!    :)   

Being here in LA has been awesome! We are thoroughly enjoying the summer, the beaches, the food and of course the myriad of outings possible.

My daughter is enjoying her classes, the projects and activities at camp during the day and the outings in the evening are fun for her too. :)

So, here's my little guide to LA; the places we've been to and the things we've done. Maybe you or someone you know will find it helpful in some way. :)


Places:

Santa Monica - Pacific Park & Pier, Farmer's Market (a must to check out!), Santa Monica Place, 3rd Street Promenade
Hollywood - Walk of Fame, Kodak Theater, Disney Soda Fountain and Shoppe
Manhattan Beach - We stayed close enough for several evening outings, enjoyed the beach atmosphere a lot
El Segundo - has all your usual stores and restaurants, of course a Costco with gas too...
Thousand Oaks - nice residential area... just stayed with family so didn't go out.  But, I did hear that there is a Charming Charlie there, but didn't check it out...


Restaurants: 

Corner Bakery - Manhattan Beach
LA Food Show - Manhattan Beach
Cozymel's - El Segundo
The Farm - The Grove
Islands - Manhattan Beach
Panchanga - Manhattan Beach
Healthy Hummus - Manhattan Beach
Cafe Crepe - City Walk
Louie's Pizza - Universal Studios
Pizza Anitca - Santa Monica Place
Disney Soda Fountain & Shoppe - Hollywood
La Monica's Pizza -  Westwood
Diddy Reese - Cookies!!!   - Westwood
The Natural Cafe - San Luis Obispo


Coffee Shops:

Peet's - San Luis Obispo
Coffee Bean and Tea Leaf - (2 locations: Manhattan Beach (nice) & The Grove (not so nice))
Intelligentsia - Awesome coffee!!  -  Venice, CA
Groundworks - Hollywood

Farmer's Markets: 

Thousand Oaks - kid & hubby went with my cousin... so don't know first hand... but, they came back with delicious strawberries so thumbs up for it 

Santa Monica - went twice - on my own and then made the hubby take some time off from work to go again  :)  -  Amazing place!  Heard that I'll see chefs stop by to pick their produce but, didn't believe it until I actually saw them there.  Great place to hang out, people watch, oh ya and of course shop.  Since we had a kitchen, I was able to cook meals with my fresh produce - could really taste the difference  :)


Shopping:

The Grove - American Girl Place - My daughter couldn't wait to go here!  Ok, that is an understatement to say the least! As her father will tell you.... 3+ hours and a Personal Shopper later!!!  The American Girl Place is not for the faint of heart!!  ;-)  In more ways than one....  she enjoyed every minute of it though... and so we came home with a new friend....Kanani.  :) 

Beverly Hills/Rodeo Drive
Westfield Culver City
Santa Monica Place
The Market @ Santa Monica Place
Third Street Promenade
Manhattan Village

Frozen Yogurt / Treats:

Yogurt Creations - San Luis Obispo - we stopped both ways  :)
Popcornopolis - really never knew one could have popcorn in THAT many flavors!!


Activities/Amusement Parks:

Universal Studios:  Had a blast! It was my 8 year olds first time and I think it was the perfect age to take her... she knew enough about movies, etc... and was game to go on all the rides... helped that she had her older college-aged cousins spend the day with us too - so Jurassic Park ended up being her most favorite ride!!

Sea World:  Lotsa fun!  Enjoyed the shows.  Shamika and I rode Atlantis!! Awesome! We soo would have gone again had the lines not been 1.5 hours+!! long.
Disneyland & CA Adventure:  Our SoCal trip concluded with a 3 Day Park Hopper to the "Happiest Place on Earth!!"  Enjoyed every minute of it because it's one of my favorite places to go to  :P  Also helped that the 405 freeway was closed on Day 1 and Day 2 of said 3-Day Park Hopper. ;)


Beaches:

Manhattan Beach - spent lotsa time here - great place :)
Redondo Beach - caught a mini-concert here on our last night - was great way to end our SoCal stay!

Tuesday, June 14, 2011

Cookies!!!! Inspired by...

Decorating cookies takes a little practice, patience, a steady hand, and time but, is a lot of fun once you get the hang of it.  There are several steps involved depending on the shape and design but, using an outline & flood method makes it doable. Nowadays there are several helpful tools out there to make it even easier to give it a try. Here are a few I've made recently.  Hope you like them...  :)

Now, more chances than not, you've heard of the very popular game Angry Birds!!! So, here's my 1st version of the Yellow Bird, Green Pig & Red Bird! 

Angry Birds!!


Ready for Tea Time?  Well, here's a tea cup cookie I made for a tea party baby shower favor.  :)

Tea Cups!


And... depending on whether or not you have a younger, say 7-11yr. old child at home, you may have heard about the new up and coming "semi-educational" website for them called Moshi Monsters.  So, after much convincing (on her part!), my 8 year old daughter joined it.  She created a pet and enjoys playing on it with her friends who have joined as well. In addition to the 6 main "monsters" which really aren't "monsters" in the literal sense (some of them are cute, at least I think so) :)  they have lots of baby monsters called Moshlings. (Which apparently I'm told, never grow up!)  Why am I telling you about them? Well, as another wish for her birthday, my daughter wanted me to make Moshi Monster cookies... so, looking at the myriad of them and all my cookie cutters I had to make informed decisions on which ones I could claim that I could re-create. ;-)  Here's my go at them:  Cutie Pie, Dipsy, Hansel, Roxy, Iggy, & Oddie.


Dispy  & Roxy!

Oddie!

Hansel!


Iggy!
Cutie Pie!

Cutie Pie!
Dipsy!
Hansel!
Roxy!
Iggy!
Oddie!


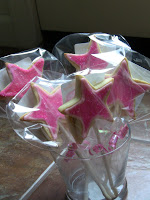
And last but, not least...Pinkalicious!! Here are my sparkly star wands inspired by Pinkalicious for a 4 year olds' Pinkalicious party!!  Pretty in pink??  :o)


Star Wands!

Pinkalicious!


Thursday, June 9, 2011

Innovative Cake Ideas!

My daughter recently had a birthday and all she Really! wanted was a slumber party with a few of her closest friends from school. This being her (our!) very first one, my husband and I inhaled deeply and agreed to her request.  :)

She proceeded to plan out the details of what was going to happen that fateful (oops, read: exciting!) evening. My responsibilities of course, included providing the food, drink & cake. :) So, me being me, had to find out if there was any kind of cake that was special for a slumber party. :o)

Well....low and behold...  look what I found on one of my favorite sites, Family Fun!  I had a blast making it; it's quite easy actually.  The girls had fun picking out which one they wanted. Although the recipe calls for 5 Twinkies, since there were 6 girls, I placed 6 Twinkies comfortably on top.

Here it is.... maybe you'll give it a try for your child's next slumber party.  It would be really easy to change the icing colors and the hair/face on the wafers to turn them looking more like boys. :)


Slumber Party Cake!
Little girls in their sleeping bags.  :)

Sunday, May 15, 2011

Update: Gram's Best Brown Sugar Cake

So, earlier this week I posted about Gram's Best Brown Sugar Cake, for which I had the recipe but, no picture and it had been bothering me. Well, not for long. :o)

An invite to the cousins came at a great time... for me and hopefully for them too. ;-)  As the usual getting together process goes.... invite... date....and then I ask, "what can I bring?" Fully well knowing and keeping my fingers crossed that no regular main dish be asked.  :p  The reply arrives to the notion that I may bring a box of sugar if I would like and they would be happy. ;-)

My chance had arrived...what better recipe to bring than... Gram's Best Brown Sugar Cake!?

Just a note if you try it. I don't add the extra powdered sugar on top.  It is already sweet enough in my opinion. :)

So, here is the picture...  enjoy!  :)

Tuesday, May 10, 2011

Time flies when you're having fun!

So, April went by in a flash. Time was spent with family and friends and of course the much awaited arrival of Spring Break!!  I did a little baking (Gram's Best Brown Sugar Cake, Zucchini Bread & Biscottis) during my cousins visit and was happy to have company in the kitchen. :)  Here are a few recipes to share from then...

Here's the Zucchini Bread recipe (thanks to Jen K. for it!).  If you're thinking my kid would never go for zucchini in bread, lest you be assured that you can't really "see" the zucchini in it. And if you choose to use the chocolate chips, well then.... the little specks of green magically disappear! :o) 

3 Eggs, beaten
1 cup Oil
2 cup Sugar
2 tsp Vanilla
2 cups Grated Zucchini
(if you're short on zucchini add grated carrot works just the same)
3 cups Flour
1 tsp Baking Soda
1 tsp Baking Powder
1 tsp Salt
2 tsp Cinnamon
2 cups chocolate chips or nuts, or combination of the two
(after making it a few times, I've come to where I seperate the batter into different batches at this point - a handful or two of chocolate chips in one for the kid and just nuts in the other for us, once you make it you'll get an idea for what your family cares for)

Preheat oven to 350 degrees.
Beat eggs. Add oil, sugar, vanilla, and zucchini. Beat with an electric mixer.
Mix flour, soda, baking powder, salt and cinnamon. Add to egg mixture. Beat well and add nuts/chocolate chips.

Bake approximately 1 hour in 2 well greased and floured loaf pans.

I've made them in loaf pans, mini loaf pans and as muffins, they taste any either way.  :) 

Zucchini Walnut Bread

Gram's Best Brown Sugar Cake is a recipe I found sometime ago in a Kraft magazine. It's a moist and delicious party cake.  Unfortunately, it hasn't stayed intact long enough for a worthwhile picture (note to self: next time, picture first, serve later) ;)

Here's the recipe in any case because, if you make it, you will like it even without my picture. ;) Enjoy!

Which brings me to last week. It was a busy week at my house (I guess like all our houses these days!) Spanish presentation, Teacher Appreciation Week, Cinco De Mayo, and mundane household to do lists that were growing!

For my daughter's Spanish presentation she and a friend were studying Venezuela.  She asked if there was something she could take to class so that their classmates could sample Venezuelan food too. And I of course being me said, "well, let me see." :)  So, after a little bit of research and an apparent passing comment from her teacher, it was settled.  I was trying my hand at Arepas, Venezuelan Corncakes. :) 

Here's the recipe I used and it turned out well. We all liked it at home and a couple of kids in class told me they liked them too.  The teacher told me they tasted good and my attempt was good.  ;)  Apparently, they also make them stuffed with cheese. I will have to try that sometime.  :)

You have to use a special cornmeal for it, which of course (after much shop-hopping) I found only at my local Wal-Mart. So, if you'd like to try it, buy the Minsa brand, it worked. :)  Serve them hot!


Venezuelan Arepas


In honor of Cinco De Mayo and my intent to make something different for our meal with a treat (how convienient), we ended up with Mexican food; enchiladas, veggie "oven fries", and dessert. I had been wanting to try these little bite sized yummy cookies for a very long time. This was my opportunity.  ;) 

Mexican Wedding Cookies!! They're delightful; I wonder why I'd waited this long to try them. :) I've got a few ideas for variations and look forward to updating with them soon. In the mean time...allow your mouth to water or try making these! :)

Mexican Wedding Cookies

Happy Baking & Creating!!

Friday, April 1, 2011

Biscotti - A Twice Baked Treat

Finding ourselves at home on a recent gloomy, rainy Sunday afternoon with a few free hours wondering what to do was much welcomed at our home. :)  Everyone wanted a snack but, nothing at home seemed inviting or interesting to eat. So, my daughter busted out her cookbooks and I, mine. Let's see what what can come up with. Yikes! We both scoured through, but didn't find anything of liking or anything fast enough. After all everyone was already hungry to begin with!

After many rounds of options and missing ingredients we settled upon Biscottis. Unfortunately by now, the coffee had already been drunk but, maybe another cup would have to be made. ;)
 
This is one of my tried and true recipes. It came from a recipe book that was one of those "free book included" books from our very first espresso machine which we received as a wedding present. Although over the years the machine is long gone, I still very much use the recipe book. Funny how things work out sometimes.

I've tweaked it to my family's liking and have started experimenting with different add-ins as well. Try them out with a nice cup of coffee and you won't be disappointed. :) Maybe you'll pretend to be in Italy! ;)

Biscottis

3 cups flour
2 teaspoons baking powder
1/8 teaspoon salt
2 large eggs
1/4 cup canola oil
3/4 cup sugar
1 1/2 teaspoons vanilla extract
1 cup chopped walnuts

Optional add-ins/substitutions:

* 1/2 cup Chocolate Chips OR
* Substitute 1/2 cup Chopped Almonds & 1/2 cup Chopped Dried Cranberries OR
* 1/2 cup Chopped Almonds & 1/2 cup Chopped Dried Cranberries & 1/2 White Chocolate Chips OR
* Add Walnuts, Almonds or Pecans when baking then, melt 4 ounces of Bittersweet Chocolate. (see ** below)

Preheat oven to 350 degrees. In a bowl stir together flour, baking powder, and salt.  In a large bowl or mixer bowl, combine the eggs, oils, sugar, and vanilla extract. Beat until well combined. Add the flour mixture, nuts, or other add-ins and mix until combined. Batter will be stiff and slightly sticky.

With floured hands, divide dough into thirds. Place one third of the dough on ungreased baking sheet and form into an elongated loaf about 1 inch think and 3-4 inches wide. (or whatever length you prefer).  It should be of uniform shape and thickness for best results.

Proceed with the remaning two portions of dough. The loaves should not touch each other but, they can be arranged close together.

Bake for 20-25 minutes. Remove from the oven and let stand 2-3 minutes, leave oven on. Use a sharp knife to cut the loaves into 1/2 inch slices. Let stand 5 minutes, then turn the slices down on one cut side. Return to the oven and bake for 5 minutes, remove the pan and turn the slices over. Bake an additional 5 minutes. Cool the biscotti completely on the pan.

**If you are making the dipped biscotti. Then break the bittersweet chocolate into pieces and place in a medium bowl. Place the bowl in a microwave oven and melt the chocolate on high for about 1 minute or use double boiler method if preferred. The chocolate should be smooth when stirred. Dip one cut side on each slice of biscotti into the chocolate. Place frosted side up on wax paper to dry.

Store biscotti in an airtight container for 2-3 weeks.

Ciao!


Almond Biscotti


Cranberry Almond Biscotti


Chocolate Chunk Biscotti

Thursday, March 31, 2011

Going Bananas!!

So, what is a household to do with extra ripe bananas that noone wants to eat? Why make Banana Nut Bread of course!

This happens every so often at my house.  This fruit which sometimes disappears and sometimes doesn't, makes for great breads and muffins. 

Here's a recipe we've been making in my family for many years. According to my recipe book, I got it from my Aunt, my Mother's older sister.

Since my daughter attends a "Nut Free" (really is that possible?;)) school, I make her a few for snack before adding the nuts in. :)  Seems silly to write that you're thinking to yourself? But, I've done it before.  Told her I was making something cool for snack and have had a momentary lapse of thinking and added the nuts in. There goes the snack for the week.

This is a pretty forgiving recipe too. If you have an extra banana feel free to add it in.

I use loaf pans, muffin pans, or mini muffin pans for this recipe.  Hope you'll enjoy it!  :)

Banana Nut Bread

Preheat oven to 350 degrees. Grease baking pans or prepare muffin tins.

Mix the following ingredients together.

2 cups AP Flour
1 cup sugar
3 bananas (mashed)
1 tablespoon lemon juice
1 stick unsalted butter (softened)
2 eggs (beaten)
2 tablespoons yogurt
1 1/2 teaspoons baking powder
1/2 teaspoon baking soda
1/2 teaspoon salt
1 cup walnuts, chopped

Bake!

Loaf - approximately 1 hour.

Muffins - 10-17 minutes according to size.


Tuesday, March 15, 2011

Cookies, As Party Favors?

Cookies and handmade treats have grown to become a familiar part of the "party favors" in goodie bags for a few years now. There's just something about a sweet treat that makes everyone happy on their way home. :)

A lot of friends whom I see regularly, know that in this "process of my life" is my ongoing affair with starting a personalized diaper cake and party favor company.  :) When I get orders it's a humbling feeling and the creative juices flow through my brain. ;) 

My latest was a Mad Science themed birthday party. Um... when I think Mad Science, I think beakers, flasks and test tubes! So, I hunted around to see what I could find in those shapes. Can you believe I actually found Science themed cookie cutters?! Amazing!

So, with the cutters ordered, I went on to thinking about decorating them. :) The mom of the birthday boy and I came up with the colors and the request that "bubbles" going up the flask was made. YEAH! I was super excited. :)

After much piping and flooding, here's the final product. :)

Beaker Cookies

Beaker Cookies All Wrapped Up!


At the Party....


Pic by CB

Pic by CB

 
Pic by CB


Now I know what to make for the Science Fair! ;)

As I wrote this up, it got me thinking back to when I first started out making cookies on a stick...Here's a look at the first ever "cookie bouquet" I made for a friend's baby shower. :)


My First Cookie Bouquet


Here's my latest, updated version...


Ducky Bouquet


Ducky Cookie :)


At a Baby Shower....


Pic. by YR

Happy Baking & Creating....   :)

Sunday, March 6, 2011

Potlucks: How "Lucky" are you?

Last week (yikes! this week's gone by fast!) we went to a friends house for dinner. I offered to bring something and we settled upon dessert (ha! ha! I know what you're thinking). :o) No brainer for me. Of course, given the option I would always pick bringing Dessert over dals, curries, and rice dishes. ;)

As I asked around my house for suggestions or cravings which needed filling, we finally settled upon Carrot Cake.  It's one of my favorite recipes. I found it on the back of a buttermilk carton many, many years ago and adapted it to my family's liking.

Here's the recipe, hope you'll give it a try.

I've always made it either as a Bundt cake or cupcakes sans frosting (do we really need more sugar?).  :)   But, feel free to try the other pans: 2 - 8 or 9 inch round pans would be great. Especially layered with a cream cheese frosting. :)

Enjoy!


Subha's
Carrot Cake


Subha's Carrot Cake
(adapted from the original recipe of the Blue-Ribbon Carrot Cake)

3 eggs
3/4 cup Extra-light Olive Oil
3/4 cup whole, low-fat or non-fat buttermilk
2 cups sugar
2 teaspoons vanilla extract
2 cups all purpose flour
2 teaspoons baking soda
2 teaspoons cinnamon
½ teaspoon salt
2 cups grated carrots
1 cup (8oz) coarsely chopped walnuts


Preheat oven to 350.

1. To make cake: In a mixing bowl with electric mixer, beat eggs, oil, buttermilk, sugar, and vanilla until blended.

Add flour, baking soda, cinnamon, and salt; mix until incorporated.

Blend in carrots and walnuts.

Pour into 1 greased 9 by 13-inch baking pan or 2 greased 9-inch layer cake pans, or 1 greased Bundt pan.
In a 350 oven, bake for 50 to 55 minutes or until a wooden pick inserted in the center comes out clean.

2. While cake bakes, make frosting if you would like. Remove cake from oven and let cool for 10 minutes.  If you have a seperate serving plate then, remove from pan.

3. Allow cake to cool fully.

4. After cake cools, frost and refrigerate at least an hour until frosting is set.

The cake may be refrigerated for several days.

Friday, February 25, 2011

Cupcakes & Muffins...Is there a Difference?

Ever wonder if there really is a difference? Cupcakes have generally become known as the "sweeter" of the two, with muffins generally being considered the "healthier" option.  Nowadays though, with the variety of recipes out there, I believe that's highly debatable.  :)

Regardless, these smaller descendants of the whole cake and loaf bread are almost always sure crowd pleasers; at least that's what I've found. And now with the invention of the mini muffin pans they are even smaller and much easier to eat. One could make do with just a napkin in most cases.

Pan liners are available in all sizes, shapes and colors these days so you can pretty much pour any recipe into a cupcake or muffin pan instead.  The adults like them because you can try a couple and not think you're actually eating a whole one ;) and the kids love them because well, anything that looks like a cupcake must be yummy junk food! I personally find them easy to make, serve and clean up.  ;)

Here are a few of my favorites...

I came across a cookbook called Cupcakes from the Cake Doctor at my daughters school book fair a few years ago. It has turned out to be a fabulous purchase for me - if for only one recipe.  Have you ever tried the Sugar Bowl Bakery's Brownies?  You know, the small, almost bite-sized morsels of yummy, chocolate fudge goodness.  :)

Now that your mouth is watering wouldn't you like to create them fresh and warm right at home?

In the following recipe, the Cupcake Doctor does just that. It's as close to the real thing as you can get. :)

Little Fudge Brownie Bites
 - Muffin Pan Liners
(or vegetable spray for the pans)
- 1 package (20oz) Brownie Mix
(Ghirardelli mix is great. If you use a different brand just add an extra 1/2 cup of chocolate chips)
- 1/3 cup Water
- 5 tablespoons Butter, melted
- 1 large Egg
- 1 teaspoon pure Vanilla Extract
- 1/2 cup Semisweet Chocolate Chips

Preheat oven to 350 degrees. Fill mini muffin pans with liners or lightly spray them.  Place brownies mix, water, butter, egg, vanilla, and chocolate chips in a large mixing bowl. Stir to combine for 50 strokes, or until the batter is smooth. Scoop batter into each cup - about three quarters full. Place in oven.

Bake cupcakes until they puff up and edges are crisp but centers still soft, 12-14 minutes. Remove from pans and place on wire rack to cool.

Enjoy!   :) 


Fudge Brownie Bites

 
So, you'll quickly realize that I am a big fan of Trader Joe's.  :) 

A product that they have usually carried in the fall is the Pumpkin Muffin/Bread mix. However,  I think they're carrying it year round now. :)

It makes for a very easy quick muffin. In and out of the oven in less than 20 minutes.  You can't really beat that. If you're looking for a quick bite, make up the recipe on the box. I always add a handful of chopped nuts for an added touch; pecans or walnuts go well.

If you'd like to dress it up a Cream Cheese Frosting would be delicious.  :)


Pecan Pumpkin Muffins


And if you're looking for something on the savory and spicy note, another one of my easy creations is a Jalapeno Cornbread Muffin.

I use the Trader Joe's Cornbread Mix for starters.  To that I add the following ingredients in varying proportions depending on whom I'm baking for. If kids will be eating them too, I make a batch first without the Jalapenos.

Jalapeno Cornbread Muffin

1 Box Trader Joe's Cornbread Mix - follow directions on box

To that add:
Approx. 1/2 - 3/4 cup of Corn kernels
Approx. 1/2 - 3/4 cup of Mexican Blend Cheese
1/4 - 1/2 cup of Chopped Jalapenos - depending on how spicy you would like it

It's quite a forgiving batter so if you prefer it a little more of any it's not going to hurt.
Mix it all up. Pour into lined or unlined but, greased muffin pans.  You could always bake it in an 8x8 greased pan as well, if you are baking in an 8x8 follow directions on box.

For Mini Muffins for: approx. 12-14 minutes
For Muffins for: approx. 15-18 minutes


Let it cool and enjoy!

Tuesday, February 22, 2011

After a loong weekend...

Don't you ever feel like you need a vacation after a vacation? I almost always do, no matter where we've been or how many days it's been. :)  

Our family headed out to the snow, our now yearly endeavor which in the past has included a failed attempt at us trying to get our child into the winter sport of skiing!  It hasn't gone well and this time, we all but gave up.  We decided to keep things easy (for everyone!) and just go hang out in the snow and have some fun tubing and sledding. We were happy to have friends come along with us and my kid thoroughly enjoyed their company.  :)

Now that I'm back though, gotta head back into the kitchen.  You may envision a little bit of feet dragging into that if you would like.  :o)  After all, the name of my blog infers baking and not daily cooking. ;-)

For starters, I've got the "Hotel Breakfast" to compete with.  ;-)  It always happens. Since my daughter was born we've found it easier to eat in the hotel and get the morning meal over with; that way everyone starts off happy, rather than hungry and miserable, trying to find somewhere else to eat. And now over the years it's become a tradition.

This time my daughter openly exclaimed that she would be more than happy to live in hotels all the time where she could always have so many fun things to chose from. Lovely, I would be more than happy too I'm thinking... we could be traveling the world while we're at it.  Which brings my thoughts to why she likes things there and how come when we can have pretty much all the same things at home, it's just not as fun and exciting. 

Um...it must be the patterns on the servingware! ;)

Here's to our love of hotels, others making the bed for you and happy times eating a breakfast fit for champions! :)

Tuesday, February 15, 2011

If you like Brownies...

The most Red Heart, Red Flower, Red Everything day of the year has passed yet again.  Hope you enjoyed it with your loved ones. :)


And another fun weekend for my family; filled with reminders from my daughter that we were signed up to take brownies for her class party and a couple of get-togethers with friends and family.

So, with brownies on my mind, I set out to find a new recipe to try.  As I went through several of my cookbooks looking for that something new and interesting to jump out at me, I came across a recipe for an Oatmeal Brownie.  You may be thinking to yourself, who in their right mind puts oats and brownies together?! Um...apparently the folks at Betty Crocker and me! ;)

Since Oatmeal Walnut Raisin cookies and Oatmeal Pecan Chocolate Chip cookies are always a hit, I thought this layered brownie recipe sounded interesting (oatmeal is healthy, right?) and figured this would be easy to do as well.  My helper :) chopped up some pecans so we added them to the reserved portion of the topping as well. Feel free to omit nuts or use a different one, walnuts or hazelnuts would be nice too.

The recipe that follows is my version, simplified and modified from the original.

Here's what they looked like:


Oatmeal Fudge Layered Brownie


For the crust and topping:

2 1/2 cups Quick Cooking or Regular Oats
3/4 cup All-Purpose Flour
3/4 cup Packed Brown Sugar
1/2 teaspoon Baking Soda
3/4 cup Butter, melted
1 cup Pecans, roughly chopped

Heat the oven to 350 degrees. Grease a 13x9x2 baking pan (or line it with aluminum foil for easy clean up). Mix oats, flour, brown sugar, and baking soda; stir in margarine/butter. Keep aside about 3/4 cup of the oat mixture (and if using, add the nuts to this) to use as the topping. Press the remaining oat mixture into the pan. Bake the crust for about 10 minutes and allow it to cool for 5 minutes.

For the Brownie: 
1 box Ghirardelli Fudge Brownie Mix
(follow directions on box)


Here's a tip.  Ghirardelli Fudge Brownie mix is the bomb!   Although I have tried my hand at making brownies from scratch, there is just some thing about this mix that beats all others.  It is very moist and fudge-like and it's hard to match. So, when I'm in a pinch (and even some times when I'm not) I use this mix.  :)

To assemble the Brownies:  After you have made up the brownie mix according to the box, pour the batter over the baked oatmeal crust. Spread it around and make sure it goes over the entire crust. Top the batter with the reserved oatmeal topping mixture, spreading evenly across.  Put it in the preheated oven to bake for approximately 35 minutes. The top should be a golden brown. Remove from oven and let cool. 

Once it's cool, cut into 1 1/2 inch squares.

It makes enough for a crowd and travels well.  Enjoy!

Wednesday, February 9, 2011

Old Recipe...New Twist?

I was always under the impression that I am the only one in my house who is constantly on the lookout and "listen-out" (is that a word??) for new recipe ideas. Apparently, I learnt this past weekend, that in fact is not the case. ;)

My hubby came home and told me that a colleague at work was telling him about a recipe (who knew techie guys discussed food!?) ;)  and that reminded him of another recipe and how would that taste if we changed it up? I'm in!!

We took his usual staple of Egg Bhurji (which is like an Indianized version of extremely scrambled eggs) to Tofu Bhurji (substituting tofu for the eggs).

So, with my 7 year old "kitchen helper-in-training" we set out to try this new recipe for ourselves. She chopped all the tofu into the tiny pieces, while I cut up the rest. :)

Here's our recipe for approximately 1 person. 

We finely chopped (totally the key to type of recipe) to start:

approx. 1/4 of the Tofu block
half a large onion
half a large tomato
half a green bell pepper

a little bit of olive oil
Salt, to taste
Cumin powder - 1/2 tsp.- to taste
Coriander powder - 1/2 tsp. - to taste
Red Chili powder - 1/2 tsp. - to taste
Turmeric - just a pinch

First, saute the onions, when they are almost done, add the bell peppers, and after some time the tomatoes. After they all fry together a bit, add the salt.  After the tomatoes let out some water, add the chopped tofu. As you mix everything together the tofu will become crumbly. Add the cumin powder, coriander powder, red chili powder and turmeric. Keep stirring until everything gets mixed together. Once all the ingredients have come together and the tofu is a looking cooked through, your dish is done. It should look something like this. :)   Good Luck!

Tofu Bhurji


Substitutions:

Red Chili Powder - Finely Chopped Green Chilies
Tofu - Eggs
Tofu - Paneer